集群调整数据重分布方案
写在前面:
此方案可用在本身数据存储分布倾斜,选择的所有表的分布健差不多一致的历史项目实用。轻易不用。
背景
某公司营销报表数据库目前数据分布不均匀,本身集群计算资源比较吃紧,常有两个几点报cpu使用率超过80%以上,加上日益增长数据量和业务跑数据存储过程,加上以前定的现有的分布列修改涉及的表和存储过程及其复杂,进行表分布列的更改工程量大耗时长且容易牵一发动全身,这种情况下,从数据库层面进行nodedatamap表分布情况进行数据库优化调整成为最为靠谱省力省时的办法。
数据实际情况分析
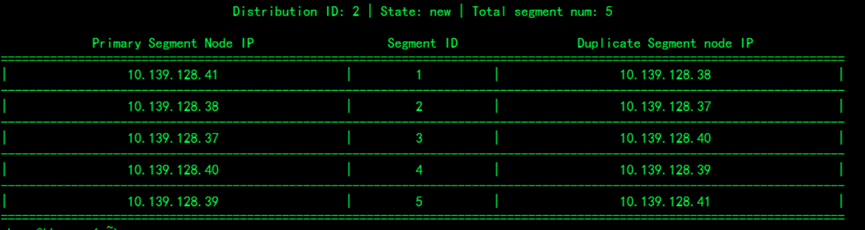
图1:数据节点分布
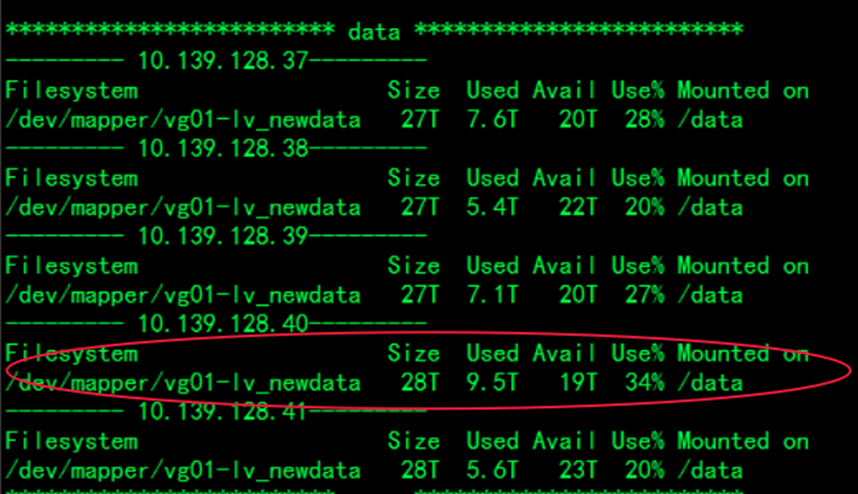
图2:整体数据存情况
目前的整体数据存情况(图2),数据总大小35.2T. N1(*.139.128.41,38),
N2(*.139.128.38,37), N3(*.139.128.37,40), N4(*.139.128.40,39), N5(*.139.128. 39,41)节点数据占总数据比约等于15.5%,18.3%,24.1%,23.4%,17.8% ,存在分布不均。
查看几个点典型的存储过程较长耗时涉及的表,与及数据开发工程师反馈,以固定分布列comid 为分布列的表,造成数据倾斜,查看数据情况,其中一张典型表(RP_T_RENEWALTEAMINSTANCEDETAIL)数据分布情况如下:

图3:cluster_table_segments分布统计
数据分布n3远远大于其他n2节点。查看整体数据存储盘,存储一致,如果按照comid的值来进行调整节点,能优化不少。
整体数据占比,和单表数据占比趋势相同,根据单表数据分布情去调整nodedatamap ,进行重分布,可使整体数据倾斜减轻,达到均匀分布的目的。
具体操作过程
准备工作:
根据hash散列数据分布原理,计算表节点分布情况,跟整体情况
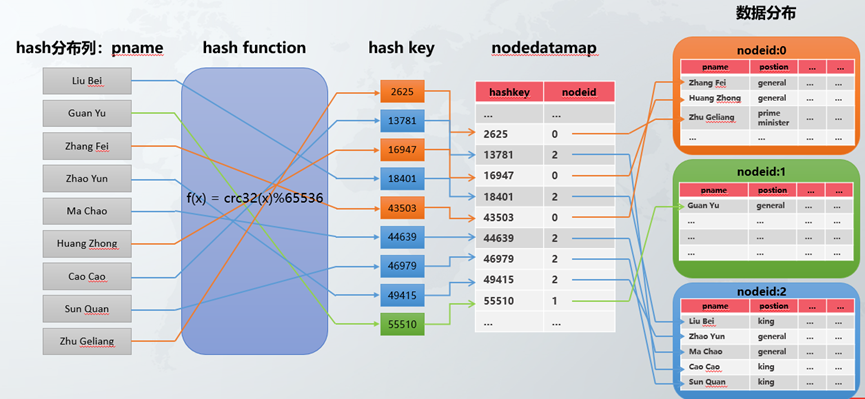
图4:hash散列数据分布原理:
根据图4可以推理得到显示目前表数据分布情况如表:

如果把数据量大的节点数据挪一些到数据量小的节点去,5个节点,使得各个节点数占比在20%左右,达到数据均匀,相同颜色放到同一个节点去,数据如下:
comid | 数据行数 | crc32(comid)%65536 | nodeid | 调整后单节点数据量 | 调整后单节点占比 | 更改nodedatamap置为1 |
23000000 | 13578215 | 9395 | 0 | 198100311 | 0.196031183 | |
46000000 | 3121923 | 12926 | 0 | |||
36000000 | 25246549 | 19586 | 0 | |||
35020000 | 10523724 | 21056 | 0 | |||
34000000 | 38807021 | 28125 | 0 | |||
21020000 | 7196783 | 41575 | 0 | |||
37020000 | 8887392 | 1837 | 1 | 190770417 | 0.188777848 | |
31100000 | 379854 | 7164 | 1 | |||
22000000 | 10059903 | 34567 | 1 | |||
15000000 | 14587720 | 44047 | 1 | |||
54000000 | 1829181 | 53547 | 1 | |||
21000000 | 23289503 | 60687 | 1 | |||
11000000 | 14540641 | 98 | 2 | 207693576 | 0.205524247 | |
50000000 | 25056329 | 1358 | 2 | |||
43000000 | 36077470 | 22848 | 2 | |||
53000000 | 17461826 | 24773 | 2 | |||
33000000 | 83644662 | 35583 | 0 | 1 | ||
32000000 | 72783782 | 38523 | 1 | |||
13000000 | 66176750 | 49653 | 2 | |||
41000000 | 48380560 | 57763 | 2 | |||
12000000 | 15981434 | 60768 | 0 | 1 | ||
35000000 | 40079649 | 4112 | 3 | 204763148 | 0.202624427 | |
37000000 | 52514532 | 12042 | 3 | |||
61000000 | 29218567 | 18892 | 3 | |||
44000000 | 68358725 | 31229 | 3 | |||
64000000 | 6849554 | 34769 | 1 | 1 | ||
62000000 | 14591675 | 38909 | 3 | |||
51000000 | 52103528 | 49079 | 1 | 1 | ||
14000000 | 20780782 | 55412 | 4 | 1 | ||
52000000 | 19794793 | 8260 | 4 | 209227646 | 0.207042294 | |
42000000 | 72430779 | 26880 | 4 | |||
65000000 | 10636902 | 31540 | 4 | |||
44030000 | 24145761 | 40250 | 4 | |||
33020000 | 14801463 | 55181 | 4 | |||
45000000 | 33209290 | 55731 | 4 | |||
31000000 | 7769945 | 62601 | 4 | |||
63000000 | 5657931 | 62871 | 4 |
通过修改新建的nodedatamap 表的nodeid 字段,然后进行重分布,实现数据均匀分布,若新生成的nodedatamap 数据跟旧的一直,则执行更新部分,若新生成数据跟旧表不一致,则重行分析调整内容,进入gn层执行:update gbase.nodedatamap set nodeid = 0 where hashkey = 35583 and data_distribution_id = <新生成的distribution id>,之后再进行。
以下具体执行步骤。
步骤 1:
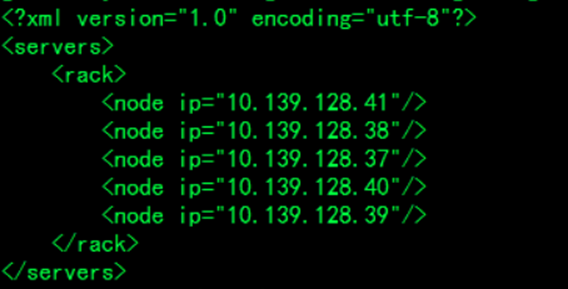
检查安装目录下的 gcChangeInfo.xml 文件,节点 IP 统一rack,即将扩容后的所有节点 IP 都写入 gcChangeInfo.xml 文件。
vi gcChangeInfo.xml 编辑
步骤 2:
执行创建 distribution 的命令,一个主分片,一个备份分片,将原有分片尽可能分布到原节点上。
$ gcadmin distribution gcChangeInfo.xml p 1 d 1 pattern 1 db_user gbase db_pwd ****
查看:
$ gcadmin showdistribution
步骤 3:
初始化 hashmap 并进调整后进行数据重分布
gccli –uroot (或gccli -u root -p *****,后面也如此)
gbase> set global gcluster_rebalancing_concurrent_count=0;
gbase> initnodedatamap;
gbase> select * from gbase.nodedatamap where hashkey in ( 60687,34567,1837,44047,53547,7164,41575,9395,19586,21056,28125,12926,12042,34769,4112,38909,31229,55412,18892,49079,26880,8260,40250,55731,55181,62601,62871,31540,49653,60768,24773,38523,98,1358,35583,22848,57763) order by hashkey,data_distribution_id;
--查看新生成的和旧生成的是否有区别。
gbase>quit;
进入各节点 gccli -uroot
gbase> update gbase.nodedatamap set nodeid = 0 where hashkey = 35583 and data_distribution_id = 新生成的distribution id;
gbase> update gbase.nodedatamap set nodeid = 0 where hashkey = 60768 and data_distribution_id = 新生成的distribution id;
gbase> update gbase.nodedatamap set nodeid = 1 where hashkey = 34769 and data_distribution_id = 新生成的distribution id;
gbase> update gbase.nodedatamap set nodeid = 1 where hashkey = 49079 and data_distribution_id = 新生成的distribution id;
gbase> update gbase.nodedatamap set nodeid = 4 where hashkey = 55412 and data_distribution_id = 新生成的distribution id;
gbase>quit;
这步很重要,一定要重启:
$ gcware_services all restart
$ gcluster_services all restart
gccli –uroot
gbase> rebalance instance;
gbase> update gclusterdb.rebalancing_status set priority = 1 where table = ‘表名’
-- 这里执行多次调整表优先级
gbase> set global gcluster_rebalancing_concurrent_count=6;
-- 设置并行
gbase> select index_name, status, percentage from gclusterdb.rebalancing_status;
-- 查看重分布情况;
gbase> quit;
此过程需要较长时间,等待执行完成,数据就进行了重分布。
步骤4:
删除旧的 distribution,目前的 distribution id 为2,新增应为3,留下3,删掉2,重启gcware,重启数据库。
$ gcadmin showdistribution
确认当前集群中没有使用旧的 Distribution ID 的表后执行删除旧分布表。
$ gcadmin rmdistribution 2
$ gcadmin showdistribution
评论
热门帖子
- 12025-12-01浏览数:183851
- 22023-05-09浏览数:26533
- 42023-09-25浏览数:20216
- 52020-05-11浏览数:18976