某电力行业应用与GBase8S数据库 适配之旅
1、业务情况
1.1 GBase 8s是基于安全数据库管理系统共享存储的系统
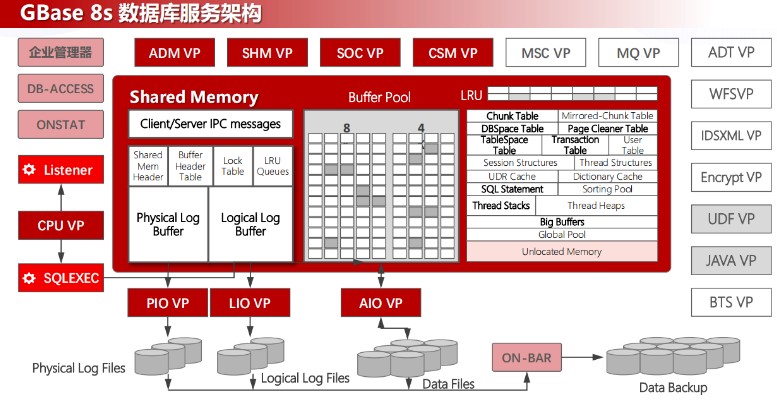
拥有自主知识产权,产品达到安全数据库四级标准(国际B2),支持国密算法。支持SQL92/99、ODBC、JDBC、ADO.NET、GCI(OCI/OCCI)、Python接口等国际数据库规范和开发接口。
通过等保四级、商密、电科院评测等多种标准的相关测试,具有数据保密、权限控制、抗攻击、用户行为追踪等安全功能,支持多种加密方式和国际主流及国产密码算法。
150项主流数据库兼容语法,满足应用的无更改迁移需求。提供多种迁移工具和实时同步工具,为应用迁移及试运行过程中的业务准确性及稳定性保驾护航。
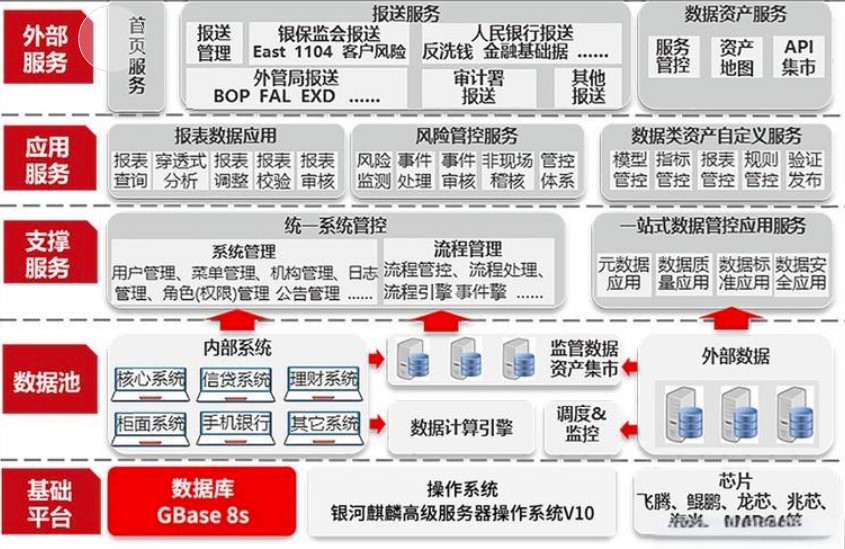
深度适配国产平台:已完成对全部国产平台的深度适配工作,支持多种国产CPU、操作系统、中间件和开发框架。
1.2、某电力数据平台数据存储情况
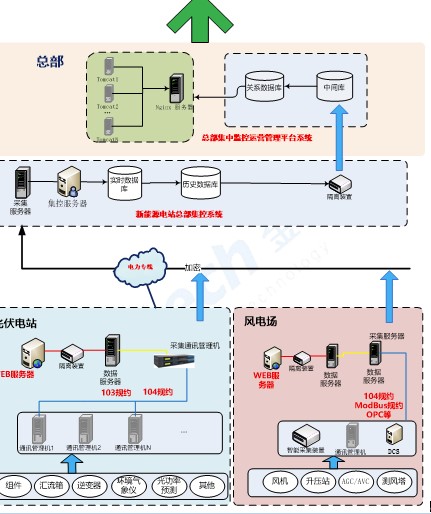
某电力总部集控中心实现“场站无人或少人值守,远程集控、片区集中检修”的运维新模式。以此达到精减运行值班岗位,优化检修力量,减少运行维护成本,改善员工生活和办公条件的目的。通过对电站运行数据进行分析,以此为基础为后续的场站对标、项目选址、项目决策、项目后评价提供前提条件。
 ……
……
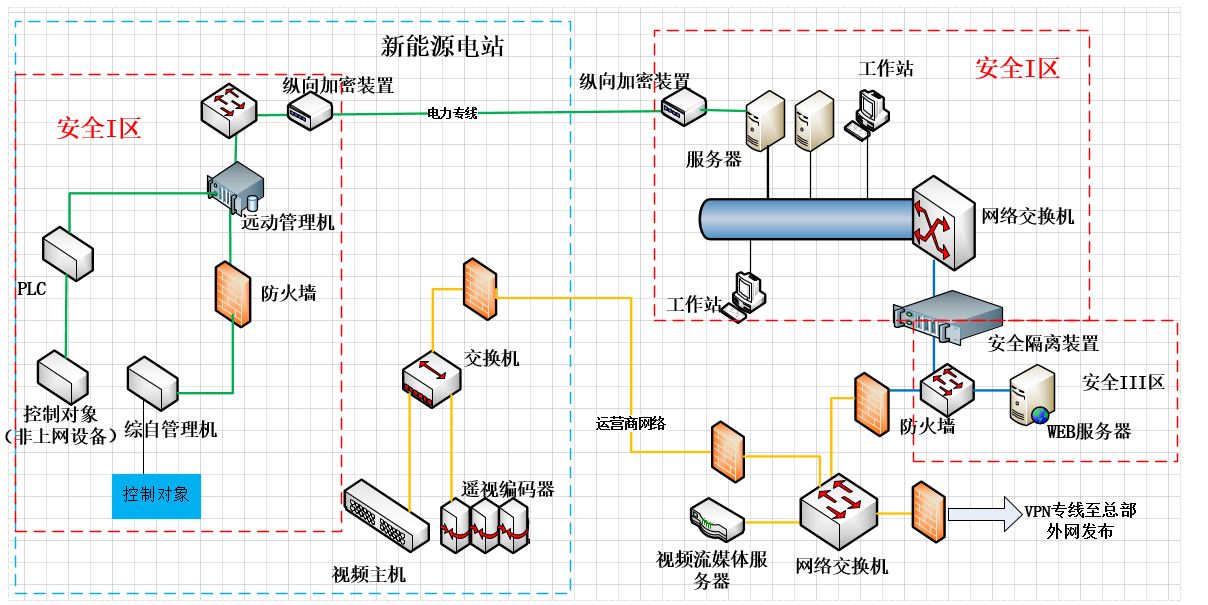
其中某总部运营管理平台系统,集成远程集控、运营管理两大部分功能,具体分为风电、光电、水电等多个模块,其运维管理系统和在线监测智能诊断系统。
全面提升电力及机关社会稳定大局的能力和水平,更好地服务于建设经济、和谐某省服务的现实需求。
信息系统定级为第三级
节约新能源电站运营成本。实现监控站点少人值守,本地人员的相关工作可以由集控中心少量人员完成,显著节约人力成本。
设备故障智能分析判别能力。通过系统将采集数据对比分析,智能预警,故障事前预判。
提高电站综合效率和发电量。通过对采集的各类数据的分析可以判段出影响发电量的原因。
提升电站生成运行管理水平。通过系统电站统一管理,实现设备、运行、维护一体化电站管理。
 2、系统数据库情况
硬件情况,某省电力核心数据库项目建设时采购的数据库服务器,型号IBM服务器,操作平台linux 系统,IP地址172.168.*.*,部署*******,版本为****2 双机集群数据库软件,服务器从购置到目前已运行11年,硬件运行故障风险极高,升级的硬件为H3C服务器,
数据库软件升级为南大通用 GBASE 8s V8,信息系统定级为第三级。
3、数据库软件安装规划表
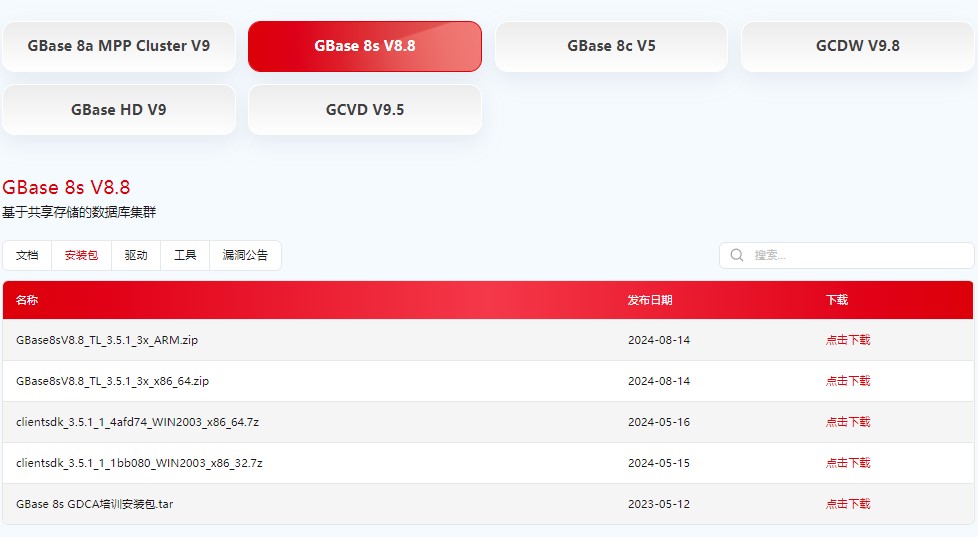
3.1、下载介质地址
https://www.gbase.cn/download/gbase-8s-1?category=INSTALL_PACKAGE
3.2、信息列表
| 类型 | 相关信息 | 备注 |
| 操作系统 | CentOS-7.6-x86_64-DVD-1810 | X86 CentOS7 |
| 服务器地址 | 192.168.58.133 | 节点 |
| 数据同步工具 | GBase Migration Toolkit | |
| 监听端口号 | 9088 | |
| 字符集名称 | zh_CN.utf8 | |
| 安装包 | GBase8sV8.8_TL_3.5.1_3x_x86_64 | 数据库软件 |
测试环境,如上表是一些安装要求及明细信息,有了这些信息也方便以后的运维,为以后的日常运维减少一些不必要的麻烦。
四、服务器原数据库实例及安全
4.1、数据库的相关情况
| 用户名 | 密码 | SID | 用途 |
| BSC_GR*_TBL | 总部基础数据 | ||
| BSC_RE*_TBL | 区域基础数据 | ||
| BSC_ST*_TBL | 电站基础数据 | ||
| BSC_DE*_TBL | 部门基础数据 | ||
| BSC_DE*_WORKTYPE_TBL | 部门工作类别 | ||
| REL_ST*_OPERATION_TBL | 电站实时发电数据 | ||
| REL_REGION_OPERATION_TBL | 区域发电实时统计 | ||
| BIZ_GROUP_DAY_*_TBL | 集团日计划发电量 | ||
| BIZ_REGION_*_PLAN_TBL | jnjp2_mrep | 区域年计划发电 | |
| BIZ_STATION_DAY_PLAN_TBL | jnjp2_wrep | 电站月计划发电量 | |
| BIZ_STATION_MONTH_PLAN_TBL | jnjp2_prep | 电站月计划发电量 | |
| BIZ_GROUP_MONTH_PLAN_TB | jnjp2_tocc | 集团月计划发电量 | |
| BIZ__run | jnjp_run | RUN应用二包 | |
| BIZ__ing | jnjp_huanjing | ING监测数据 | |
| BIZ__dip2 | Jnjp_2013 | dip业务数据 | |
| BIZ__ip2_mrep | jnjp2_mrep | Ip2中间库 |
原服务器数据库实例及用户
4.2、解决ssl的问题
安装:openssh-9.8p1-1.el7.x86_64.rpm、
openssh-clients-9.8p1-1.el7.x86_64.rpm、
openssh-debuginfo-9.8p1-1.el7.x86_64.rpm、
openssh-server-9.8p1-1.el7.x86_64.rpm
openssl-1.1.1h.tar,zlib-1.2.11的相关包
4.3、系统加固
启用用户登录超时
| 编号 | Linux-04001 |
| 名称 | 启用用户登录超时 |
| 系统当前状态 | 未启用用户登录超时 |
| 实施方案 | 实施方法如下,进入Linux系统,执行如下命令: Vi /etc/profile 加入 TMOUT=300 export TMOUT (编辑文件/etc/profile,在最后下一行增加: TMOUT=300,则所有用户将在5分钟无操作后自动注销) |
| 实施目的 | 加强Linux系统自身的安全 |
| 回退方案 | 加固前创建备份目录,按照日期命名:(不用重复创建) mkdir /root/backup2024 将需要修改的配置文件复制保存在备份目录: cp /etc/profile /root/backup2024/ 需要回退的时候将修改前的备份文件覆盖回配置文件即可: cp /root/backup2024/profile /etc/profile |
| 实施风险 | 无风险 |
| 是否实施 | (客户填写) |
| 安全风险 | 中 |
禁用系统的热启动键
| 编号 | Linux-04002 |
| 名称 | 禁用系统的热启动键 |
| 系统当前状态 | 未禁用系统的热启动键 |
| 实施方案 | 实施方法如下,进入Linux系统,执行如下命令: Vi /etc/inittab 用“#”注释以下内容: ca::ctrlaltdel:/sbin/shutdown -t3 -r now 然后保存 |
| 实施目的 | 加强Linux系统自身的安全 |
| 回退方案 | 加固前创建备份目录,按照日期命名:(不用重复创建) mkdir /root/backup2024 将需要修改的配置文件复制保存在备份目录: cp /etc/inittab /root/backup2024/ 需要回退的时候将修改前的备份文件覆盖回配置文件即可: cp /root/backup2024/inittab /etc/inittab |
| 实施风险 | 无风险 |
| 是否实施 | (客户填写) |
| 安全风险 | 低 |
修改Root帐号的umask值
| 编号 | Linux-04003 |
| 名称 | 修改Root帐号的umask值 |
| 系统当前状态 | Root帐号的umask值为默认的022 |
| 实施方案 | 实施方法如下,进入Linux系统,执行如下命令: Vi /etc/bashrc 更改为027 然后保存 使用系统服务的原则如下: 为了保护应用用户的文件安全,制定安全规则如下: 1. 文件拥有者对文件拥有全部权限; 2. 与文件属主同组的用户对文件有读和写的权限,没有启动和停止应用的权限; 3. 其他用户对文件只有读权限; 上述权限的规定,要求用户创建的目录的权限属性为775,文件的权限属性为664,所以,用户的umask应该设置为002。但考虑到系统的缺省umask是022,应用属主可以根据需要进行进一步的设置 |
| 实施目的 | 加强Linux系统自身的安全 |
| 实施风险 | 加固前创建备份目录,按照日期命名:(不用重复创建) mkdir /root/backup2024 将需要修改的配置文件复制保存在备份目录: cp /etc/bashrc /root/backup2024/ 需要回退的时候将修改前的备份文件覆盖回配置文件即可: cp /root/backup2024/bashrc /etc/bashrc |
| 是否实施 | (客户填写) |
修改系统的启动模式
| 编号 | Linux-04004 |
| 名称 | 修改系统的启动模式 |
| 系统当前状态 | 未禁用系统X11程序 |
| 实施方案 | 实施方法如下,进入Linux系统,执行如下命令: Vi /etc/inittab 更改为3模式 然后保存 |
| 实施目的 | 加固前创建备份目录,按照日期命名:(不用重复创建) mkdir /root/backup2024 将需要修改的配置文件复制保存在备份目录: cp /etc/inittab /root/backup2024/ 需要回退的时候将修改前的备份文件覆盖回配置文件即可: cp /root/backup2024/inittab /etc/inittab |
| 实施风险 | 无风险 |
五、操作系统适配情况
5.1、准备服务器
要安装数据库服务器,首先需要准备PC服务器,本次安装实例中,PC服务器有4个CPU核心、8GB内存、多块的硬盘。
如果手头上没有这种配置的的服务器,可以考虑使用Vmware Workstation虚拟机软件,仿真出这种配置的PC服务器。
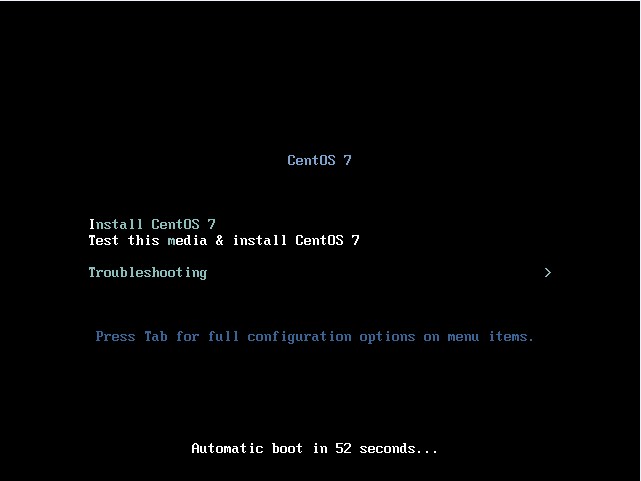
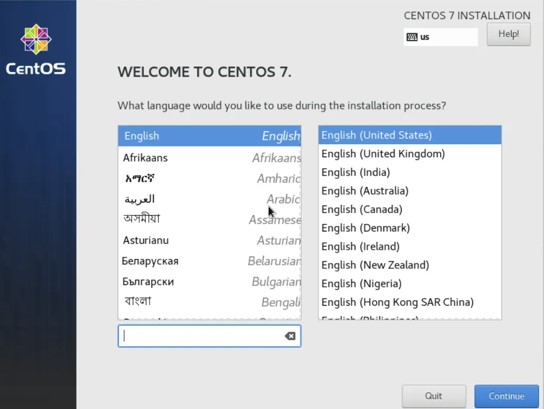
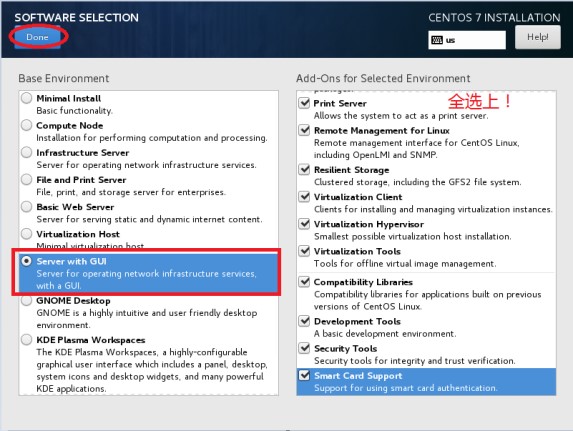
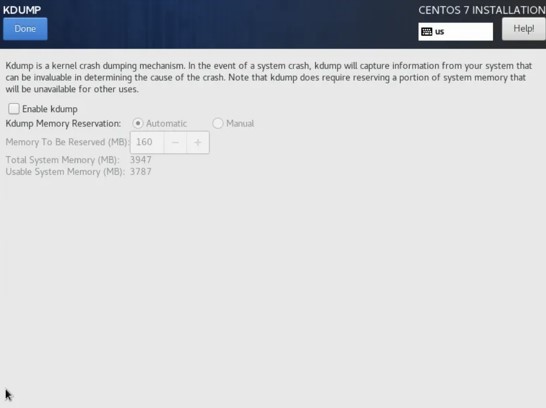
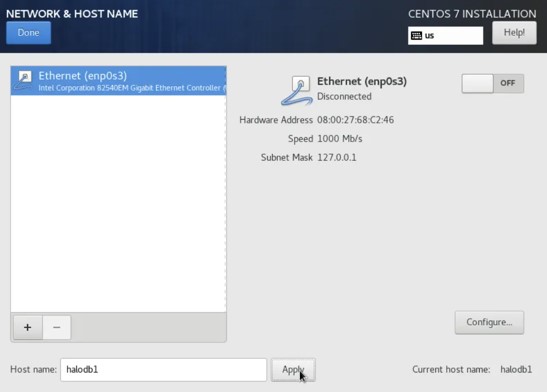
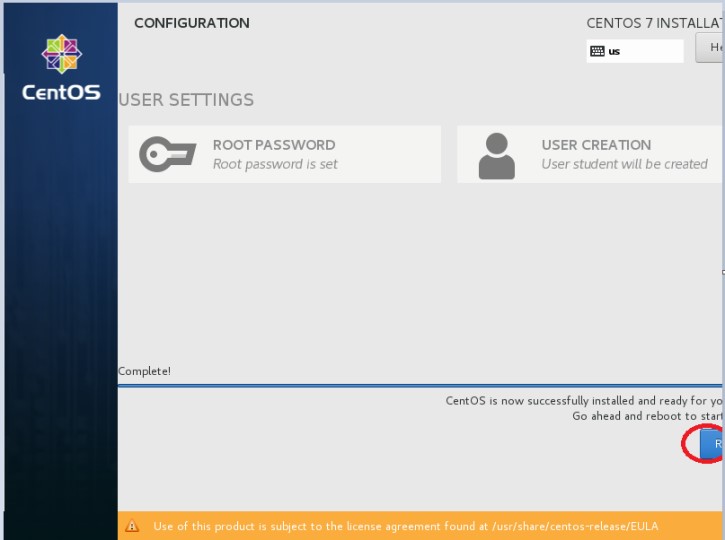
5.2、开始系统安装
5.4、配置主机名
/etc/hosts配置(可选)
如果采用默认主机名,可忽略该步骤,预安装会自动追加127.0.0.1 localhost #Gauss OM IP Hosts Mapping
cp /etc/hosts /etc/hosts.bak
cat >>/etc/hosts<<EOF
192.168.58.133 vastbase
EOF
5.5、优化参数
limits.conf
不用配置该文件,会自动追加如下内容:
cp /etc/security/limits.conf /etc/security/limits.conf_bak_`date +%F`
cat >> /etc/security/limits.conf << "EOF"
root soft as unlimited
root hard as unlimited
root soft nproc unlimited
root hard nproc unlimited
EOF
5.6、防火墙配置
systemctl stop firewalld.service
systemctl disable firewalld.service
如果启用防火墙需进行如下配置:
selinux配置
sed -i "s/SELINUX=enforcing/SELINUX=disabled/g" /etc/selinux/config
setenforce 0
5.7、检查时区和时间
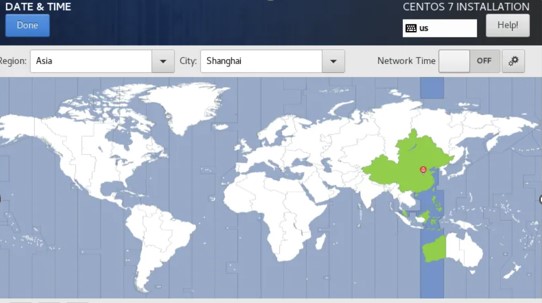
请确保操作系统时间无误,且时区为上海时区(或者香港时区)。
//检查时区
timedatectl
//修改时区为上海
timedatectl set-timezone Asia/Shanghai
5.8、依赖包均已安装
检查依赖项
在安装包的 readme 中对依赖包有一定的要求,安装依赖包:jdk(1.6版本以上)、unzip、libaio、libgcc、libstdc、ncurses、pam,如果缺失请提前安装:
[root@vastbase gbase]# yum install unzip libaio libgcc *libstdc* ncurses pam
Loaded plugins: fastestmirror, langpacks
Loading mirror speeds from cached hostfile
Package unzip-6.0-19.el7.x86_64 already installed and latest version
Package libaio-0.3.109-13.el7.x86_64 already installed and latest version
Package libgcc-4.8.5-36.el7.x86_64 already installed and latest version
Package libstdc++-4.8.5-36.el7.x86_64 already installed and latest version
Package libstdc++-devel-4.8.5-36.el7.x86_64 already installed and latest version
Package ncurses-5.9-14.20130511.el7_4.x86_64 already installed and latest version
Package pam-1.1.8-22.el7.x86_64 already installed and latest version
Resolving Dependencies
--> Running transaction check
---> Package compat-libstdc++-33.x86_64 0:3.2.3-72.el7 will be installed
---> Package libstdc++-docs.x86_64 0:4.8.5-36.el7 will be installed
---> Package libstdc++-static.x86_64 0:4.8.5-36.el7 will be installed
--> Finished Dependency Resolution
Dependencies Resolved
======================================================================================================================================================================================================================
Package Arch Version Repository Size
======================================================================================================================================================================================================================
Installing:
compat-libstdc++-33 x86_64 3.2.3-72.el7 base 191 k
libstdc++-docs x86_64 4.8.5-36.el7 base 11 M
libstdc++-static x86_64 4.8.5-36.el7 base 411 k
Transaction Summary
======================================================================================================================================================================================================================
Install 3 Packages
Total download size: 12 M
Installed size: 100 M
Is this ok [y/d/N]: y
Downloading packages:
(1/3): compat-libstdc++-33-3.2.3-72.el7.x86_64.rpm | 191 kB 00:00:01
(2/3): libstdc++-static-4.8.5-36.el7.x86_64.rpm | 411 kB 00:00:00
(3/3): libstdc++-docs-4.8.5-36.el7.x86_64.rpm | 11 MB 00:00:05
----------------------------------------------------------------------------------------------------------------------------------------------------------------------------------------------------------------------
Total 2.0 MB/s | 12 MB 00:00:05
Running transaction check
Running transaction test
Transaction test succeeded
Running transaction
Warning: RPMDB altered outside of yum.
Installing : compat-libstdc++-33-3.2.3-72.el7.x86_64 1/3
Installing : libstdc++-docs-4.8.5-36.el7.x86_64 2/3
Installing : libstdc++-static-4.8.5-36.el7.x86_64 3/3
Verifying : libstdc++-static-4.8.5-36.el7.x86_64 1/3
Verifying : libstdc++-docs-4.8.5-36.el7.x86_64 2/3
Verifying : compat-libstdc++-33-3.2.3-72.el7.x86_64 3/3
Installed:
compat-libstdc++-33.x86_64 0:3.2.3-72.el7 libstdc++-docs.x86_64 0:4.8.5-36.el7 libstdc++-static.x86_64 0:4.8.5-36.el7
Complete!
[root@vastbase gbase]#
六、开始GBase 8s的适配
6.1、创建组和用户
GBase 8s 数据库需要一个名字为 gbasedbt的操作系统用户,做为数据库的超级用户。官方文档建议在安装前创建好 gbasedbt组和 gbasedbt用户:
[root@vastbase soft]# groupadd gbasedbt
[root@vastbase soft]# useradd -g gbasedbt gbasedbt
## 修改 gbasedbv8用户密码为 gbasedbt
[root@vastbase ~]#
[root@vastbase ~]# echo "gbasedbt:gbasedbt" | chpasswd
[root@vastbase ~]#
6.2、介质验证
[root@vastbase gbase]# ls
GBase8sV8.8_TL_3.5.1_3x_x86_64.zip
6.3、创建安装目录及授权
[root@vastbase gbase]# mkdir -p /opt/gbase
[root@vastbase gbase]# chown -R gbasedbt:gbasedbt /opt/
[root@vastbase gbase]#
6.4、看 jdk 版本1.8 符合要求
[root@vastbase gbase]# java -version
openjdk version "1.8.0_181"
OpenJDK Runtime Environment (build 1.8.0_181-b13)
OpenJDK 64-Bit Server VM (build 25.181-b13, mixed mode)
[root@vastbase gbase]#
6.6、解压缩 tar 安装包
[root@vastbase gbase]# unzip GBase8sV8.8_TL_3.5.1_3x_x86_64.zip
Archive: GBase8sV8.8_TL_3.5.1_3x_x86_64.zip
creating: GBase8sV8.8_TL_3.5.1_3x_x86_64/
inflating: GBase8sV8.8_TL_3.5.1_3x_x86_64/AutoInit_GBase8s.sh
inflating: GBase8sV8.8_TL_3.5.1_3x_x86_64/clientsdk_3.5.1_3X1.tar
inflating: GBase8sV8.8_TL_3.5.1_3x_x86_64/GBase8sV8.8_TL_3.5.1_3X1.tar
inflating: GBase8sV8.8_TL_3.5.1_3x_x86_64/readme.txt
[root@vastbase gbase]#
[root@vastbase gbase]# ll
total 435852
drwxr-xr-x 2 root root 118 Aug 14 11:01 GBase8sV8.8_TL_3.5.1_3x_x86_64
-rw-r--r-- 1 root root 446312258 Oct 21 16:28 GBase8sV8.8_TL_3.5.1_3x_x86_64.zip
[root@vastbase gbase]# ll GBase8sV8.8_TL_3.5.1_3x_x86_64
total 519160
-rw-r--r-- 1 root root 21797 Jul 31 17:32 AutoInit_GBase8s.sh
-rw-r--r-- 1 root root 185180160 Aug 13 10:26 clientsdk_3.5.1_3X1.tar
-rw-r--r-- 1 root root 346408960 Aug 13 10:27 GBase8sV8.8_TL_3.5.1_3X1.tar
-rw-r--r-- 1 root root 2657 Jul 31 17:32 readme.txt
[root@vastbase gbase]#
[root@vastbase GBase8sV8.8_TL_3.5.1_3x_x86_64]# ll
total 1038244
-rwxrwxr-x 1 root root 21797 Jul 31 17:32 AutoInit_GBase8s.sh
-rw-r--r-- 1 root root 185180160 Aug 13 10:26 clientsdk_3.5.1_3X1.tar
-rw-r--r-- 1 root root 2792 Jul 31 14:40 csdk.properties
drwxr-xr-x 2 root root 222 Jul 31 14:07 doc
-rw-r--r-- 1 root root 346408960 Aug 13 10:27 GBase8sV8.8_TL_3.5.1_3X1.tar
-rwxr-xr-x 1 root root 346290703 Jul 31 14:16 ids_install
-rw-r--r-- 1 root root 1864 Jul 31 14:16 ids.properties
-rwxr-xr-x 1 root root 185154788 Jul 31 14:40 installclientsdk
-rwxr-xr-x 1 root root 82770 Jul 31 14:16 onsecurity
-rw-r--r-- 1 root root 2657 Jul 31 17:32 readme.txt
[root@vastbase GBase8sV8.8_TL_3.5.1_3x_x86_64]#
6.5、GBase 8s 定制安装
典型安装
安装 GBase 8s 软件
图形化安装
在 root 用户下,进入安装包目录,运行安装命令 sh ids_install,启动安装程序即可:
[root@vastbase]# sh ids_install -i swing
Preparing to install...
Extracting the JRE from the installer archive...
Unpacking the JRE...
Extracting the installation resources from the installer archive...
Configuring the installer for this system's environment...
Launching installer...
Graphical installers are not supported by the VM. The console mode will be used instead...
===============================================================================
GBase Software Bundle (created with InstallAnywhere)
-------------------------------------------------------------------------------
Preparing CONSOLE Mode Installation...
===============================================================================
Getting Started
---------------
This application will guide you through the installation of GBase Software
Bundle.
Copyright General Data Corporation 2014, 2024. All rights reserved.
1. Release Notes
The Release Notes can be found in
/gbase/GBase8sV8.8_TL_3.5.1_3x_x86_64/doc/ids_unix_relnotes_12.10.html.
2. Launch Information Center
Access the GBase Information Center at http://www.gbase.cn.
To Begin Installation, respond to each prompt to proceed to the next step in
the installation.
If you want to change something on a previous step, type 'back'.
You may cancel this installation at any time by typing 'quit'.
PRESS <ENTER> TO CONTINUE:
===============================================================================
Agreement
-----------------
Installation and Use of GBase Software Bundle Requires Acceptance of the
Thank you for choosing GBase product!
DO YOU ACCEPT THE TERMS OF THIS AGREEMENT? (Y/N): Y
===============================================================================
Installation Location
---------------------
Choose location for software installation.
Default Install Folder: /opt/GBASE/gbase
ENTER AN ABSOLUTE PATH, OR PRESS <ENTER> TO ACCEPT THE DEFAULT
===============================================================================
Installation or Distribution
----------------------------
Select the installation type.
Typical: Install the database server with all features and a database server
that
is configured with default values. Includes:
** Client Software Development Kit (CSDK)
** Java Database Connectivity (JDBC)
Minimum disk space required: 700-800MB
Custom: Install the database server with specific features and software that
you need.
Optionally install a configured database server instance.
Minimum disk space required: 75 MB (without a server instance)
->1- Typical installation
2- Custom installation
3- Extract the product files (-DLEGACY option)
4- Create a RPM package for redistribution
ENTER THE NUMBER FOR YOUR CHOICE, OR PRESS <ENTER> TO ACCEPT THE DEFAULT:: 2
===============================================================================
"Choose Install Features" Help
------------------------------
On the next screen, type the number of a feature to change whether it is
selected or deselected. You can provide a list of numbers, separated by commas,
with no leading or trailing spaces.
For example, assume that the screen contains this list:
1- [X] ABC
2- [ ] XYZ
Please choose the Features to be installed by this installer.: ___
If you want to install both ABC and XYZ, type: 2
If you want to install only XYZ, type: 1,2
PRESS <ENTER> TO CONTINUE:
===============================================================================
Choose Install Set
------------------
===============================================================================
Choose Product Features
-----------------------
ENTER A COMMA_SEPARATED LIST OF NUMBERS REPRESENTING THE FEATURES YOU WOULD
LIKE TO SELECT, OR DESELECT. TO VIEW A FEATURE'S DESCRIPTION, ENTER
'?<NUMBER>'. PRESS <RETURN> WHEN YOU ARE DONE:
1- [X] GBase database server
2- |-[X] Base Server
3- |-[X] Extensions and tools
4- |-[X] J/Foundation
5- |-[X] Database extensions
6- |-[X] Conversion and reversion support
7- |-[X] XML publishing
8- |-[X] Demonstration database scripts
9- |-[X] Enterprise Replication
10- |-[X] Data loading utilities
11- |-[X] onunload and onload utilities
12- |-[X] dbload utility
13- |-[X] Backup and Restore
14- |-[X] archecker utility
15- |-[X] ON-Bar utility
16- |-[X] Interface to Tivoli Storage Manager
17- |-[X] Administrative utilities
18- |-[X] Performance monitoring utilities
19- |-[X] Miscellaneous monitoring utilities
20- |-[X] Auditing utilities
21- |-[X] Database import and export utilities
22- |-[X] JSON Client Support
23- [X] Global Language Support (GLS)
24- |-[X] Chinese
Please choose the Features to be installed by this installer.:
===============================================================================
Feature review
--------------
Would you like to review the features that you have selected, or change which
features you have selected?
->1- Continue
2- Return to feature tree
ENTER THE NUMBER OF THE DESIRED CHOICE, OR PRESS <ENTER> TO ACCEPT THE
DEFAULT: 1
===============================================================================
Install Directory not secure
----------------------------
The specified installation path is not secure. Either enter a different path or
exit the installation application and run the onsecurity utility.
root: onsecurity "/opt/GBASE/gbase"
Non root: onsecurity -p "/opt/GBASE/gbase"
PRESS <ENTER> TO ACCEPT THE FOLLOWING (OK):
===============================================================================
PRESS <ENTER> TO ACCEPT THE FOLLOWING (OK):
===============================================================================
Feature review
--------------
Would you like to review the features that you have selected, or change which
features you have selected?
->1- Continue
2- Return to feature tree
ENTER THE NUMBER OF THE DESIRED CHOICE, OR PRESS <ENTER> TO ACCEPT THE
DEFAULT: 1
===============================================================================
Database Administrative Password
---------------------------------
Type 'back' to go to the previous step or 'quit' to cancel the installation.
In order to create and run a server instance on this platform, you must provide
a password for the user that will be running the instance.
Enter the password for user gbasedbt (user will be created).:
===============================================================================
Get Role Separation choice
--------------------------
Enable role separation for auditing procedures.
If you enable role separation, you can assign existing groups of users to
specific roles.
If you do not enable role separation, the database server administrator
performs all administration tasks.
1- Enable role separation
->2- Do not enable role separation
ENTER THE NUMBER FOR YOUR CHOICE, OR PRESS <ENTER> TO ACCEPT THE DEFAULT:: 1
===============================================================================
Role Separation groups selection
--------------------------------
Assign a group of users to each of the following roles by specifying group
identifiers (group IDs). The group IDs specified must already exist on your
system.
Group for security-related tasks: (DEFAULT: gbasedbt):
Group for audit-administration tasks: (DEFAULT: gbasedbt):
Group for database users (leave blank to allow all users): (DEFAULT: ):
===============================================================================
Server Instance
---------------
Type 'back' to go to the previous step or 'quit' to cancel the installation.
Create a database server instance?
1- Yes - create a server instance
->2- No - do not create a server instance
ENTER THE NUMBER FOR YOUR CHOICE, OR PRESS <ENTER> TO ACCEPT THE DEFAULT:: 2
===============================================================================
Installation or Distribution
----------------------------
Select the installation type.
Typical: Install the database server with all features and a database server
that
is configured with default values. Includes:
** Client Software Development Kit (CSDK)
** Java Database Connectivity (JDBC)
Minimum disk space required: 700-800MB
Custom: Install the database server with specific features and software that
you need.
Optionally install a configured database server instance.
Minimum disk space required: 75 MB (without a server instance)
->1- Typical installation
2- Custom installation
3- Extract the product files (-DLEGACY option)
ENTER THE NUMBER FOR YOUR CHOICE, OR PRESS <ENTER> TO ACCEPT THE DEFAULT::
在安装过程中,可以自动创建一个数据库的实例。由于典型安装中创建的实例在配置上非常简单,不适合后期深入的学习 GBase 8s,因此我们选择不创建实例,在安装后,可以手动执行一个脚本,可以很方便的创建一个新的数据库实例。所以这里选择不创建数据库实例,输入 2,回车下一步:
===============================================================================
Server Instance Creation
------------------------
Create a server instance?
->1- Yes - create an instance
2- No - do not create an instance
ENTER THE NUMBER FOR YOUR CHOICE, OR PRESS <ENTER> TO ACCEPT THE DEFAULT:: 2
# 重要说明:
# 这个选择很重要,选择不创建实例,不但可以减少你的整体安装时间,也会让你对这款数据库,有更深入地了解。
# 安装过程中,自动创建一个数据库实例,在个别情况下,可能出现安装后,不能创建数据库现象(执行 create database 卡住,一段时间后报错退出)。这个问题的原因是sqlhosts 文件中使用了机器名,需要我们修改成服务器的 IP 地址,并重启数据库,就可以解决。也许有其它好的解决方法,不过这是我目前知道的一个方法,而且好用。
安装程序给出一个报告,列出了本次将要安装的数据库组件,按回车将继续安装:
===============================================================================
Installation Summary
--------------------
Please review the following before continuing:
Product Name:
GBase Software Bundle
Install Folder:
/opt/gbase
Product Features:
GBase database server,
Base Server,
Extensions and tools,
J/Foundation,
Database extensions,
Conversion and reversion support,
XML publishing,
Demonstration database scripts,
Enterprise Replication,
Data loading utilities,
onunload and onload utilities,
dbload utility,
Backup and Restore,
archecker utility,
ON-Bar utility,
Interface to Tivoli Storage Manager,
Administrative utilities,
Performance monitoring utilities,
Miscellaneous monitoring utilities,
Auditing utilities,
Database import and export utilities,
JSON Client Support,
Global Language Support (GLS),
Chinese
Disk Space Information (for Installation Target):
Required: 578,902,678 Bytes
Available: 92,369,674,240 Bytes
PRESS <ENTER> TO CONTINUE:
安装程序再次让用户确认安装程序的位置,回车继续下一步:
===============================================================================
Ready To Install
----------------
InstallAnywhere is now ready to install GBase Software Bundle onto your system
at the following location:
/opt/gbase
PRESS <ENTER> TO INSTALL:
等待几分钟后安装完成:
===============================================================================
Installing...
-------------
[==================|==================|==================|==================]
[------------------|------------------|------------------|------------------]
===============================================================================
Installation Complete
---------------------
Congratulations! GBase Software Bundle installation is complete.
Product install status:
GBase: Successful
GBase Connect: Successful
GBase 8s V8.8
For more information about using GBase products, see the GBase Information
Center at http://www.gbase.cn.
PRESS <ENTER> TO EXIT THE INSTALLER:
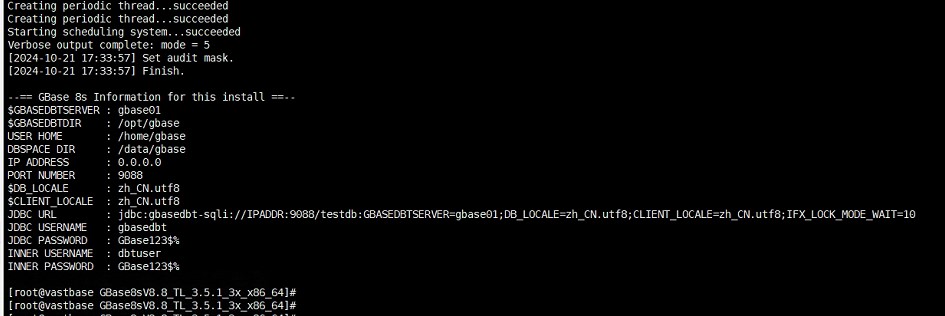
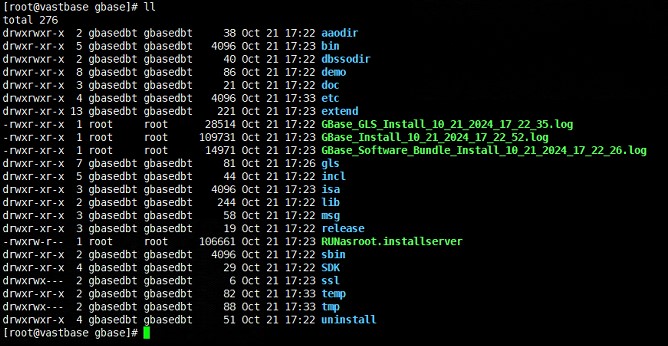
回车退出安装程序,至此,GBase 8s 数据库的组件,全部安装完成。
--== GBase 8s Information for this install ==--
$GBASEDBTSERVER : gbase01
$GBASEDBTDIR : /opt/gbase
USER HOME : /home/gbase
DBSPACE DIR : /data/gbase
IP ADDRESS : 0.0.0.0
PORT NUMBER : 9088
$DB_LOCALE : zh_CN.utf8
$CLIENT_LOCALE : zh_CN.utf8
JDBC URL : jdbc:gbasedbt-sqli://IPADDR:9088/testdb:GBASEDBTSERVER=gbase01;DB_LOCALE=zh_CN.utf8;CLIENT_LOCALE=zh_CN.utf8;IFX_LOCK_MODE_WAIT=10
JDBC USERNAME : gbasedbt
JDBC PASSWORD : GBase123$%
INNER USERNAME : dbtuser
INNER PASSWORD : GBase123$%
[root@vastbase GBase8sV8.8_TL_3.5.1_3x_x86_64]#
七、开始GBase 8s 的测试
[gbasedbt@vastbase ~]$ more .bash_profile
export PATH
export GBASEDBTDIR=/opt/gbase
export GBASEDBTSERVER=gbase01
export ONCONFIG=onconfig.$GBASEDBTSERVER
export PATH=$GBASEDBTDIR/bin:$GBASEDBTDIR/sbin:$GBASEDBTDIR/sbin:${PATH}
export GBASEDBTSQLHOSTS=/opt/gbase/etc/sqlhosts
export SERVER_LOCALE=zh_CN.utf8
export DB_LOCALE=zh_CN.utf8
export CLIENT_LOCALE=zh_CN.utf8
export GL_USEGLU=1
# export NODEFDAC=yes
export DBDATE="Y4MD-"
export DBACCESS_SHOW_TIME=1
[gbasedbt@vastbase ~]$
7.1、查看数据库状态
[gbasedbt@vastbase ~]$ onstat -
Your evaluation license will expire on 2025-10-21 00:00:00
On-Line -- Up 00:17:21 -- 3378128 Kbytes
[gbasedbt@vastbase ~]$
[gbasedbt@vastbase ~]$
7.2、关闭数据库
[gbasedbt@vastbase ~]$ onmode -ky
Your evaluation license will expire on 2025-10-21 00:00:00
7.3、开启数据库
[gbasedbt@vastbase ~]$ oninit -vy
Your evaluation license will expire on 2025-10-21 00:00:00
Reading configuration file '/opt/gbase/etc/onconfig.gbase01'...succeeded
Creating /GBASEDBTTMP/.infxdirs...succeeded
Allocating and attaching to shared memory...succeeded
Creating resident pool 142722 kbytes...succeeded
Creating infos file "/opt/gbase/etc/.infos.gbase01"...succeeded
Linking conf file "/opt/gbase/etc/.conf.gbase01"...succeeded
Initializing rhead structure...rhlock_t 131072 (4096K)... rlock_t (132812K)... Writing to infos file...succeeded
Initialization of Encryption...succeeded
Initializing ASF...succeeded
Initializing Dictionary Cache and SPL Routine Cache...succeeded
Bringing up ADM VP...succeeded
Creating VP classes...succeeded
Forking main_loop thread...succeeded
Initializing DR structures...succeeded
Forking 1 'soctcp' listener threads...succeeded
Forking 1 'soctcp' listener threads...succeeded
Starting tracing...succeeded
Initializing 32 flushers...succeeded
Initializing SDS Server network connections...succeeded
Initializing log/checkpoint information...succeeded
Initializing dbspaces...succeeded
Opening primary chunks...succeeded
Validating chunks...succeeded
Initialize Async Log Flusher...succeeded
Starting B-tree Scanner...succeeded
Init ReadAhead Daemon...succeeded
Init DB Util Daemon...succeeded
Initializing DBSPACETEMP list...succeeded
Init Auto Tuning Daemon...succeeded
Checking database partition index...succeeded
Initializing dataskip structure...succeeded
Checking for temporary tables to drop...succeeded
Updating Global Row Counter...succeeded
Forking onmode_mon thread...succeeded
Creating periodic thread...succeeded
Creating periodic thread...succeeded
Starting scheduling system...succeeded
Verbose output complete: mode = 5
[gbasedbt@vastbase ~]$
7.4、连接数据库并且测试
[gbasedbt@vastbase ~]$ dbaccess - -
[gbasedbt@vastbase ~]$ dbaccess - -
Your evaluation license will expire on 2025-10-21 00:00:00
> create database gbase8stesthhl ;
Database created.
Elapsed time: 0.588 sec
> database gbase8stesthhl
>
> CREATE TABLE mytabletbpc (name varchar(16), age int);
Table created.
Elapsed time: 0.006 sec
> SELECT * FROM mytabletbpc;
name age
No rows found.
Elapsed time: 0.007 sec
> insert into mytabletbpc values('张三',20);
1 row(s) inserted.
Elapsed time: 0.004 sec
> insert into mytabletbpc values('李四',18);
1 row(s) inserted.
Elapsed time: 0.002 sec
> insert into mytabletbpc values('王五',35);
1 row(s) inserted.
Elapsed time: 0.001 sec
> SELECT * FROM mytabletbpc;
name age
张三 20
李四 18
王五 35
3 row(s) retrieved.
Elapsed time: 0.002 sec
>
[gbasedbt@vastbase ~]$ dbaccess -
SELECT DATABASE >>
Select a database with the Arrow Keys, or enter a name, then press Return.
------------------------------------------------ Press CTRL-W for Help --------
gbase8stesthhl@gbase01
gbasedbt@gbase01
sys@gbase01
sysadmin@gbase01
sysmaster@gbase01
sysuser@gbase01
sysutils@gbase01
testdb@gbase01
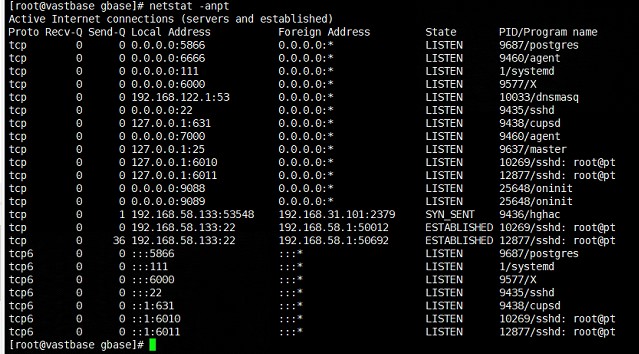
7.5、查看数据库 IP、端口
[gbasedbt@vastbase ~]$ onstat -g ntt
Your evaluation license will expire on 2025-10-21 00:00:00
On-Line -- Up 00:23:20 -- 3378128 Kbytes
global network information:
#netscb connects read write q-free q-limits q-exceed alloc/max
3/ 4 3 99 99 1/ 1 240/ 10 0/ 0 1/ 1
Individual thread network information (times):
netscb thread name sid open read write address
4eb11b90 soctcplst 4 17:55:05 0.0.0.0|9089|soctcp
4eb07be0 soctcplst 3 17:55:05 18:14:55 0.0.0.0|9088|soctcp
4eb0f290 soctcppoll 2 17:59:31
[gbasedbt@vastbase ~]$
7.6、数据库常用脚本
数据库常用脚本:
#### 查看数据库锁
dbaccess sysmaster - << EOF
select username,sid,waiter,dbsname,tabname,rowidlk,keynum,type
from sysmaster:syslocks a,sysmaster:syssessions b
where b.sid=a.owner and dbsname='gbase8stesthhl';
EOF
#### 查看表空间使用率
dbaccess sysmaster - << EOF
SELECT st.dbsname databasename, st.tabname,
MAX(dbinfo('UTC_TO_DATETIME',sin.ti_created)) createdtime,
SUM( sin.ti_nextns ) extents,
SUM( sin.ti_nrows ) nrows,
MAX( sin.ti_nkeys ) nkeys,
MAX( sin.ti_pagesize ) pagesize,
SUM( sin.ti_nptotal ) nptotal,
round(SUM( sin.ti_nptotal*sd.pagesize )/1024/1024,2)||'MB' total_size,
SUM( sin.ti_npused ) npused,
round(SUM( sin.ti_npused*sd.pagesize )/1024/1024,2)||'MB' used_size,
SUM( sin.ti_npdata ) npdata,
round(SUM( sin.ti_npdata*sd.pagesize )/1024/1024,2)||'MB' data_size
FROM
sysmaster:systabnames st,
sysmaster:sysdbspaces sd,
sysmaster:systabinfo sin
WHERE
sd.dbsnum = trunc(st.partnum / 1048576)
AND st.partnum = sin.ti_partnum
AND st.dbsname NOT IN ('sysmaster','sysuser','sysadmin','sysutils','sysha','syscdr','syscdcv1')
AND st.tabname[1,3] NOT IN ('sys','TBL')
GROUP BY 1, 2
ORDER BY 9 DESC;
EOF
八、工具数据到gbase
8.1、命令工具及数据导入到GBASE
#### 查看 dbspace 使用率
dbaccess sysmaster - << EOF
SELECT A.dbsnum as No, trim(B.name) as name,
CASE WHEN (bitval(B.flags,'0x10')>0 AND bitval(B.flags,'0x2')>0)
THEN 'MirroredBlobspace'
WHEN bitval(B.flags,'0x10')>0 THEN 'Blobspace'
WHEN bitval(B.flags,'0x2000')>0 AND bitval(B.flags,'0x8000')>0
THEN 'TempSbspace'
WHEN bitval(B.flags,'0x2000')>0 THEN 'TempDbspace'
WHEN (bitval(B.flags,'0x8000')>0 AND bitval(B.flags,'0x2')>0)
THEN 'MirroredSbspace'
WHEN bitval(B.flags,'0x8000')>0 THEN 'SmartBlobspace'
WHEN bitval(B.flags,'0x2')>0 THEN 'MirroredDbspace'
ELSE 'Dbspace'
END as dbstype,
round(sum(chksize)*2/1024/1024,2)||'GB' as DBS_SIZE ,
round(sum(decode(mdsize,-1,nfree,udfree))*2/1024/1024,2)||'GB' as free_size,
case when sum(decode(mdsize,-1,nfree,udfree))*100/sum(decode(mdsize,-1,chksize,udsize))
>sum(decode(mdsize,-1,nfree,nfree))*100/sum(decode(mdsize,-1,chksize,mdsize))
then TRUNC(100-sum(decode(mdsize,-1,nfree,nfree))*100/sum(decode(mdsize,-1,chksize,mdsize)),2)||"%"
else TRUNC(100-sum(decode(mdsize,-1,nfree,udfree))*100/sum(decode(mdsize,-1,chksize,udsize)),2)||"%"
end as used,
TRUNC(MAX(A.pagesize/1024))||"KB" as pgsize,
MAX(B.nchunks) as nchunks
FROM syschktab A, sysdbstab B
WHERE A.dbsnum = B.dbsnum
GROUP BY A.dbsnum,name, 3
ORDER BY A.dbsnum;
EOF
#### 查看数据库信息
dbaccess sysmaster - << EOF
SELECT trim(name) dbname,trim(owner) owner, created||' T' created_time,
TRIM(DBINFO('dbspace',partnum)) AS dbspace,
CASE WHEN is_logging+is_buff_log=1 THEN "Unbuffered logging"
WHEN is_logging+is_buff_log=2 THEN "Buffered logging"
WHEN is_logging+is_buff_log=0 THEN "No logging"
ELSE "" END Logging_mode
FROM sysdatabases
where trim(name) not like 'sys%';
EOF
#### 查看实例信息
dbaccess sysmaster - << EOF
select
dbinfo('UTC_TO_DATETIME',sh_boottime)||' T' start_time,
(current year to second - dbinfo('UTC_TO_DATETIME',sh_boottime))||' T' run_time,
sh_maxchunks as maxchunks,
sh_maxdbspaces maxdbspaces,
sh_maxuserthreads maxuserthreads,
sh_maxtrans maxtrans,
sh_maxlocks locks,
sh_longtx longtxs,
dbinfo('UTC_TO_DATETIME',sh_pfclrtime)||' T' onstat_z_running_time
from sysshmvals;
EOF
#### 查看字符集
dbaccess sysmaster - << EOF
select * from sysdbslocale where dbs_dbsname='gbase8stesthhl';
EOF
8.2、图形工具数据导入到GBASE
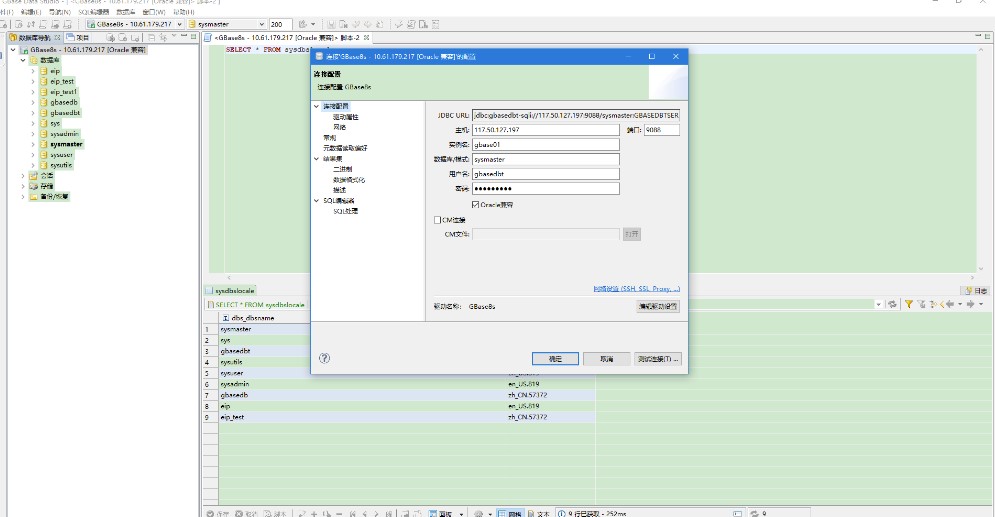
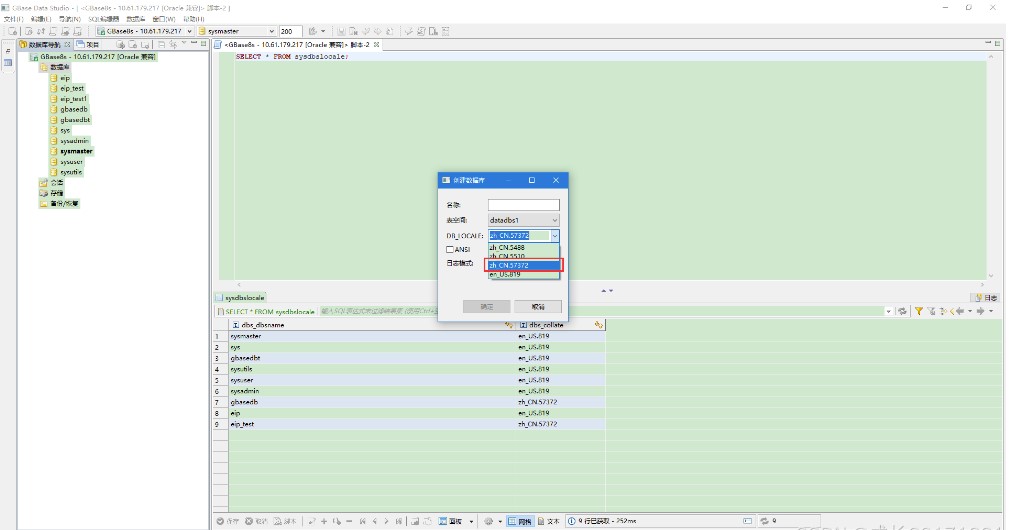
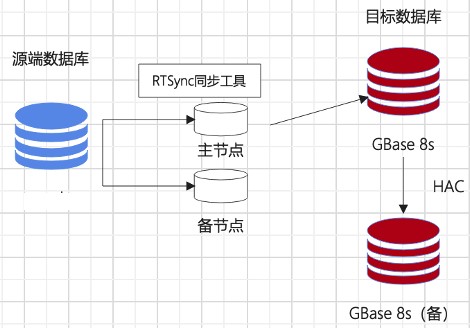
相关的语句:
库名:
drop table if exists test_target;
create table test_target(a int,b varchar(10),c datetime YEAR TO SECOND,PRIMARY key (a));
drop table if exists test_source;
create table test_source(a int,b varchar(10),c datetime YEAR TO SECOND,PRIMARY key (a));
建表语句:
库名:
drop table if exists test_source;
create table test_target(a int,b varchar(10),c datetime);
drop table if exists test_source;
create table test_source(a int,b varchar(10),c datetime);
测试语句:
insert into test_source values(1,'a','2024-09-12 11:12:30');
insert into test_source values(2,'b','2024-09-12 11:12:30');
insert into test_source values(3,'c','2024-09-12 11:12:30');
insert into test_source values(4,'d','2024-09-12 11:12:30');
select count(*) from test_target;
select count(*) from test_source;
update test_source set b = 'aaa' where a = 1;
update test_source set b = 'bbb' where a = 2;
update test_source set b = 'ccc' where a = 3;
update test_source set b = 'ddd' where a = 4;
select * from test_target;
select * from test_source;
delete from test_source where a = 1;
delete from test_source where a = 2;
delete from test_source where a = 3;
delete from test_source where a = 4;
select * from test_target;
select * from test_source;
全量复制同步:
建表语句:
库名:source \ target
drop table if exists test_all_source;
create table test_all_source(a int,b varchar(10),c datetime YEAR TO second,PRIMARY key (a));
解除CDC模式
execute function syscdcv1:cdc_set_fullrowlogging('test_8s:gbasedbt.test_target',0);
数据比对需要的系统表
drop table if exists syn_cdc_key_;
create table syn_cdc_key_(srcschema varchar(100),srctabname varchar(100),lastoper varchar(100),srcpk varchar(100),trgpk varchar(100),committime datetime);
O建表语句:
create table test_target(a int,b varchar(10),c date ,PRIMARY key (a));
create table test_source(a int,b varchar(10),c date,PRIMARY key (a));
评论

热门帖子
- 12025-12-01浏览数:182759
- 22023-05-09浏览数:25044
- 42023-09-25浏览数:18519
- 52020-05-11浏览数:17526